Tutorials ⟩ Roland MC-303 Midi Multitrack
The Roland MC-303 offers 8 tracks, which can be controlled via MIDI simultaneously:
1 track for the Rhythmsection and 7 tracks for the other internal sounds. So, a single MC-303 can be used to create a complete track or song.
But:
As some other MIDI Machines out there, the MC-303 sometimes loses track of some MIDI implementations from time to time or from case to case. Working on the MC-303 in MIDI Multitrack-Mode is sometimes tricky, and sometimes uncomfortable. The primary reason for that is, that the MC-303 sometimes "forgets" about Program Change Messages or just ignores them. No worry, you will learn how to handle that kind of problem.
Note:
The screenshots for this tutorial have been taken from the german version of the sequencer "Logic Pro X", so you will see all commands in german language instead of english. The text of this tutorial will always mention the english commands in addition.
Further:
To follow the steps of this tutorial, the MC-303 has to be connected to a MIDI device at least via "MIDI-IN".
Step 1: Initialize Soundmodule-Mode
If you want to create a track with the MC-303 using more than just one single MIDI track, then you will have to start the MC-303 in the "Soundmodule-Mode".
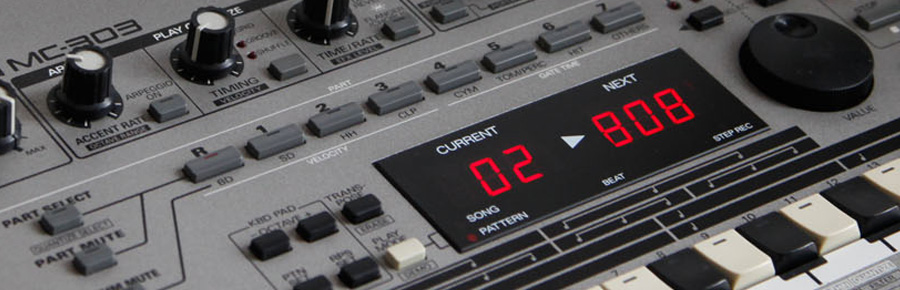
Hold down the button "Play Mode" while powering up your MC-303, as marked in the illustration below in cyan. In "Soundmodule-Mode", you will notice that the track-selectors, mute-buttons and all realtime-controllers are inactive. You can controll all these parameters via MIDI only.

Step 2: Working on the Rhythmsection
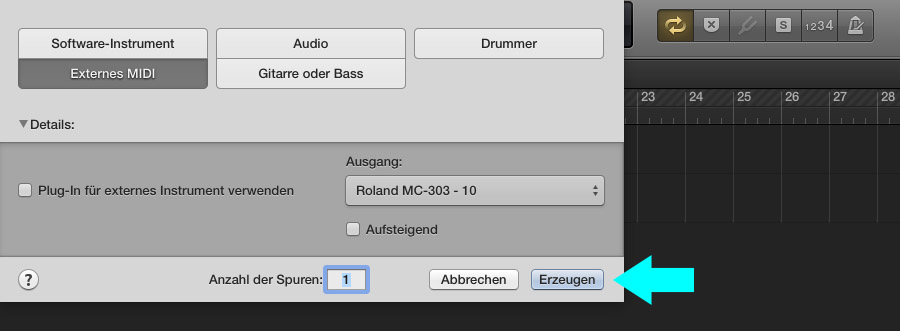
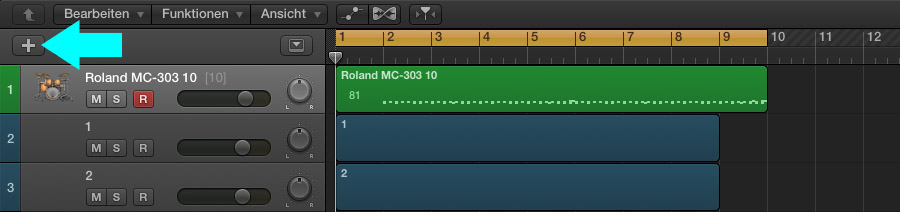
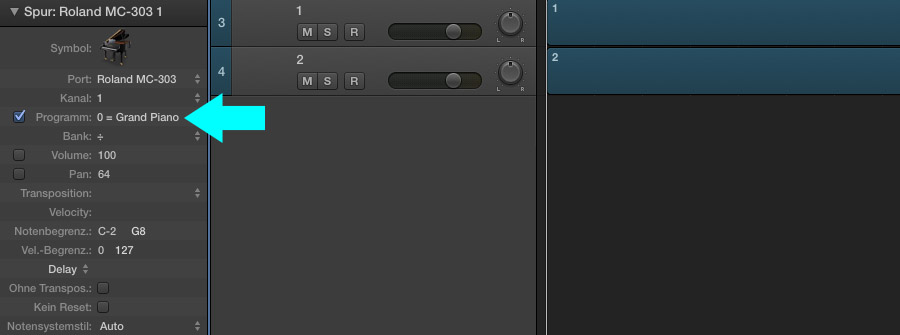
Lets say, the intention is to start with a Rhythmtrack, so the fundament for beats and percussions will be layed. On the MC-303, MIDI-Channel 10 is reserved for drums and percussions. So you will have to create a MIDI-Track for Channel 10 first in your DAW. In case of "Logic Pro X" you can select the little "+" icon, or use the menu option "Track > New tracks..."
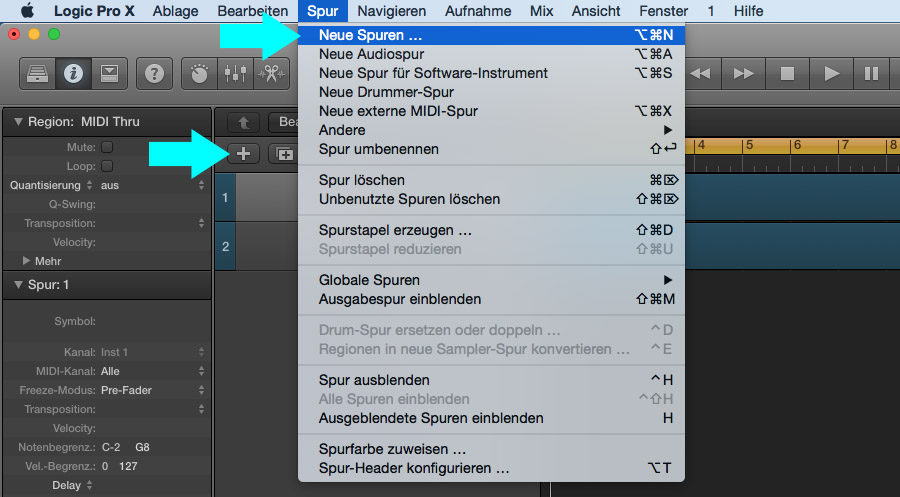
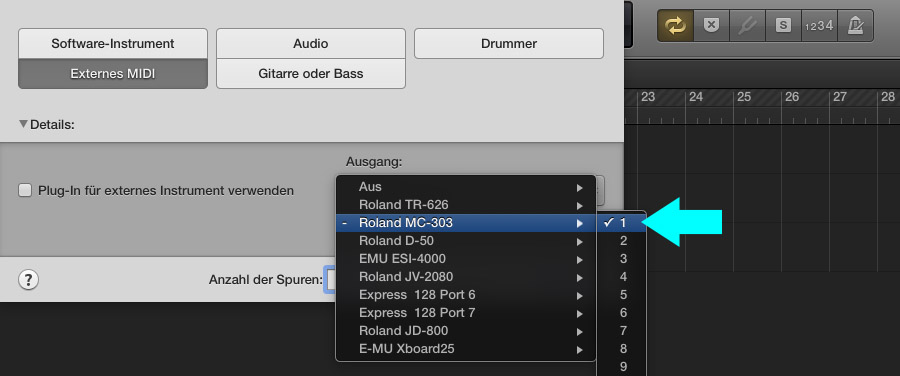
The option dialog for creating new tracks will appear. By default, a MIDI device from your list of connected devices will be available.
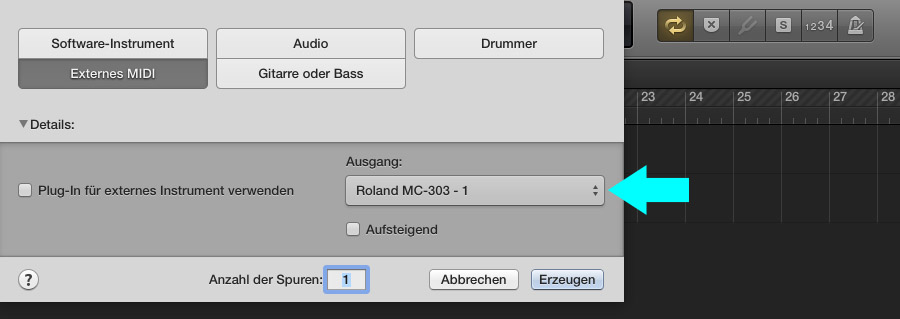
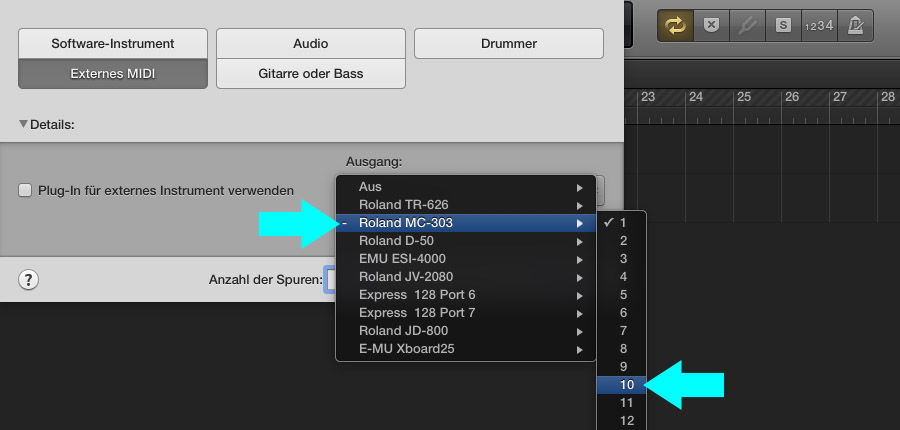
Use the dropdown menu labeled as "Output" to select the MC-303 on MIDI-Channel 10.
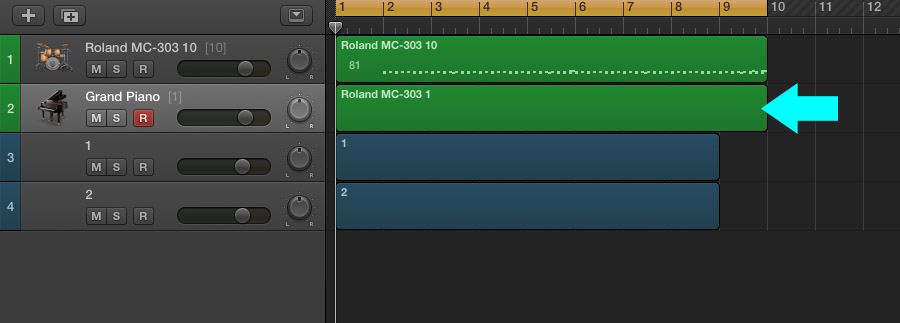
To confirm the new MIDI-Track, click the button "Create".
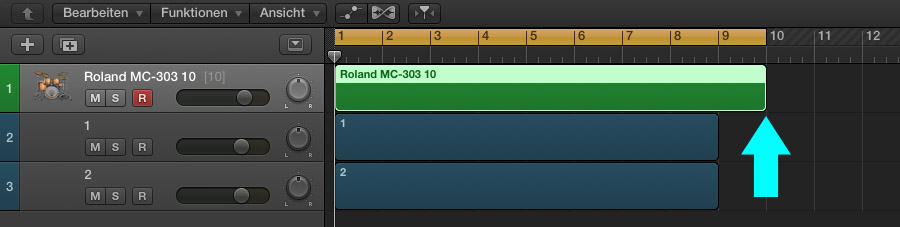
Now create an empty region on the new created MIDI-Track.
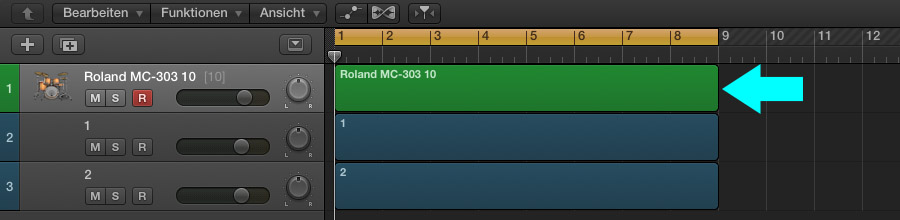
Now lets dive right into the usage of "CC-Commands" and "Program Changes". Its important to know that it is useful to create a reserved space at the beginning of your arrangement to initialize all the basic MIDI commands. In this tutorial, a MIDI-Track with a length of 8 bars has been created. So, it is a good method to extend the region by one additional bar. In the first bar right at the start of the arrangement, the MIDI commands will be inserted.
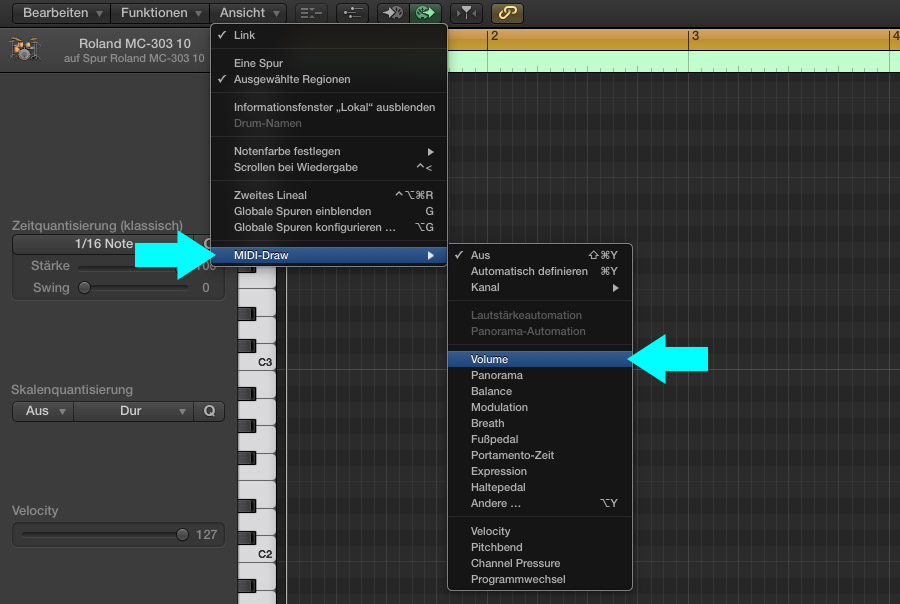
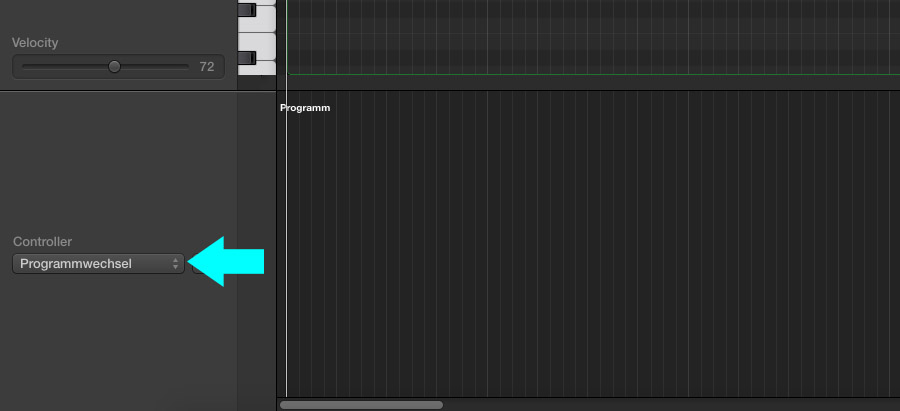
Doubleclick the MIDI-Region to enter the Pianoroll Editor. By default, you wont see the MIDI-Draw section.
To initialize that section, navigate to the Pianoroll Editor menu "View", click "MIDI-Draw" and select "Volume" (or any other displayed option).
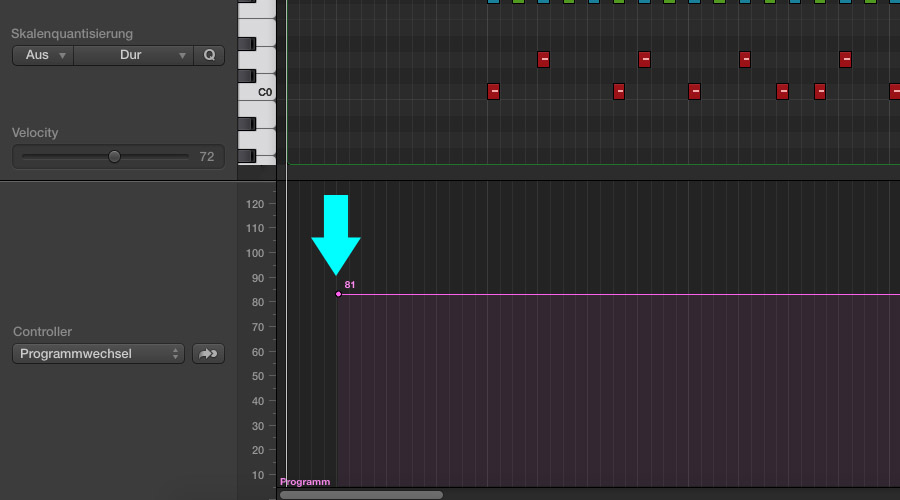
Head over to the Pianoroll Editor menu "Controller" (located on the left side), and select "Program Change".

Set a value inside the drawbar. In this tutorials case, Program Change has been set to the value of 81, so the "Hip Hop Drumset" of the MC-303 has been selected. Now proceed to draw MIDI-Events and program the beat section of your track.
Step 2: Adding more MIDI-Tracks
Create another, additional MIDI-Track by clicking onto the "+" icon.
The option dialog for creating new tracks will appear. Select the MC-303 again, and chose "MIDI-Channel 1".
As explained before, create an empty MIDI-Region. Keep in mind to keep 1 bar reserved at the beginning for initializing the required values.
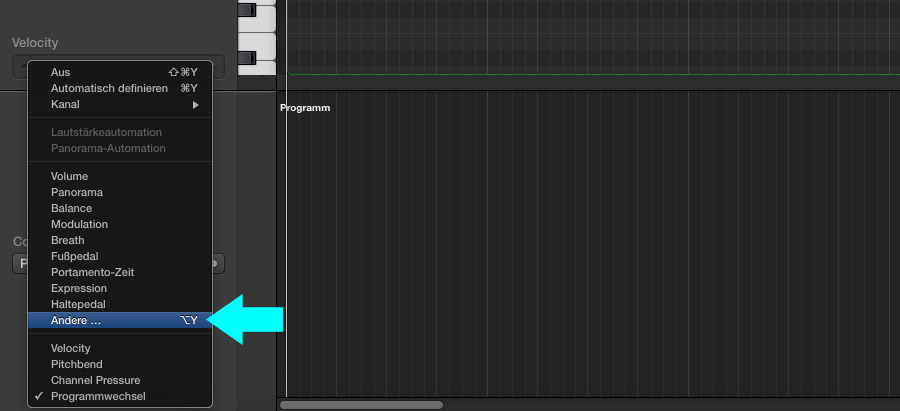
Next, you need to activate the "Program Change Function" of the new MIDI-Track. In case of "MIDI-Channel 10", it was not necessary, because the Rhythm-Section of the MC-303 just needs one single Program Change command to select the Drumkit. In case of "normal" MIDI-Tracks, the activation of the Program Change command is important.
Now doubleclick the new MIDI-Region to enter the Pianoroll Editor and navigate to the Pianoroll Editor menu "Controller" to get access to the MIDI-Draw window.
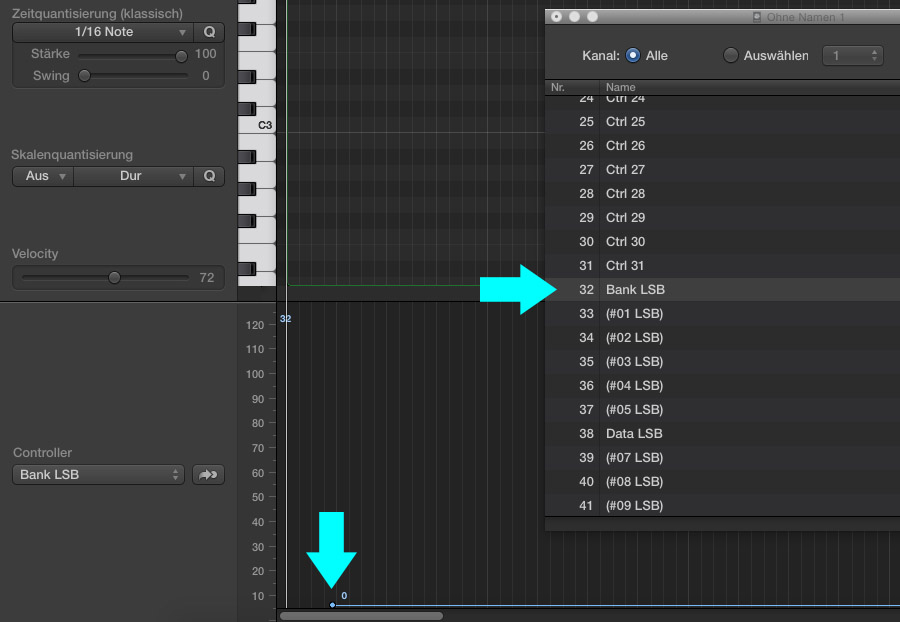
Select the option "Others..."
Set "MIDI-CC 0" (Bank MSB) to the amount of 64.
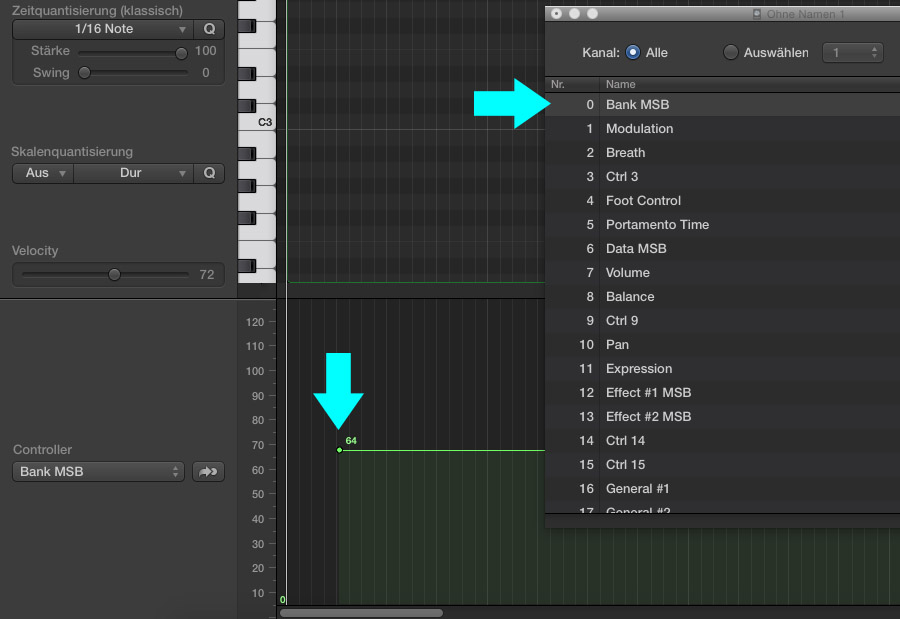
Set "MIDI-CC 32" (Bank LSB) to the amount of 0.
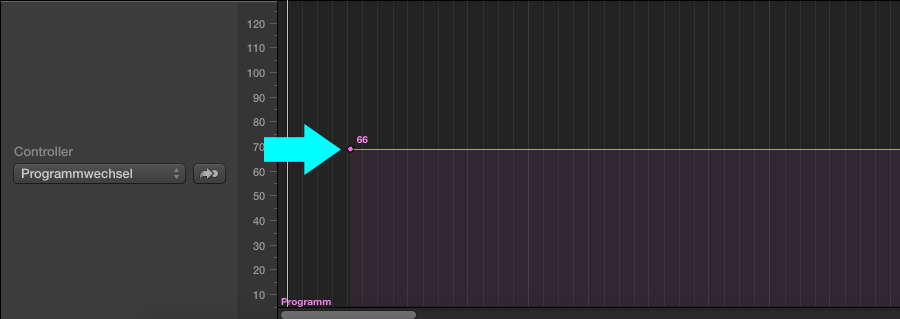
Now the "sound-selector", known as "Program Change", has to be set. In this tutorials case, the value of 66 has been chosen.
Some additional infos:
On the last MIDI-Track, you noticed, that 2 values for "CC-Controllers" and 1 value for "Program Change" are required to select a bank and a preset of the MC-303. On CC-Controller 0, the value "64" has been set. On CC-Controller 32, the value "0" was chosen. And finally, on Program Change, the value "66" has been defined. These 3 values are just example values to select the preset "101 Bass 1" from the MC-303 Soundbank "Bass".
Please refere your MC-303 manual for the complete list of banks and presets including the required values for CC-Controllers and Program Changes.
Step 3: Adding some spice
When completed your arrangement using multiple MIDI-Tracks, you maybe want to add some additional MIDI-Events like Filter-Cutoffs, Volume-Automations or Effect-Changes. This will be realized by using further CC-Controllers and values on the different MIDI-Tracks.
In this tutorial, the automation of "Volume" and "Filter-Cutoff" will be explained. Please refere your MC-303 manual for the list of automation options, required CC-Controllers and values.
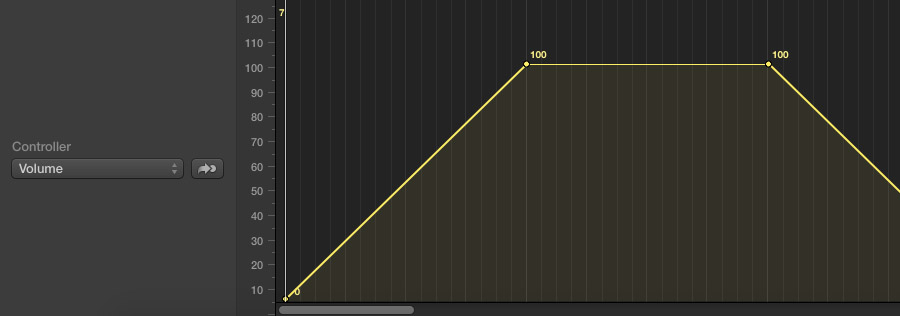
Setting the "Channel-Volume" is quite simple. Doubleclick the MIDI-Region, you want to edit. Navigate to the Pianoroll Editor menu "View", select "MIDI-Draw" and click the option "Volume".
Draw your automation, Fade-Ins and Fade-Outs are also possible.
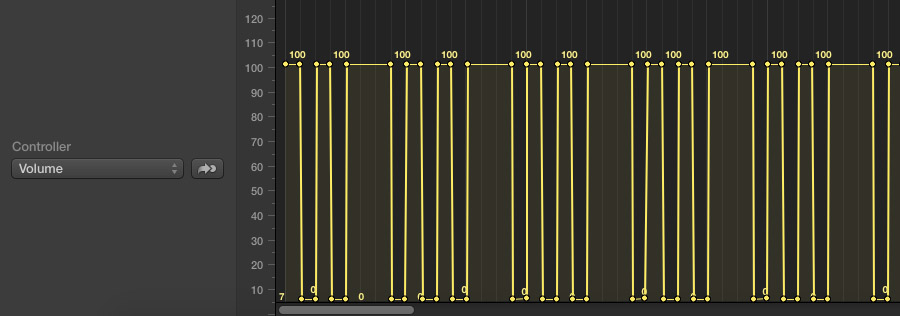
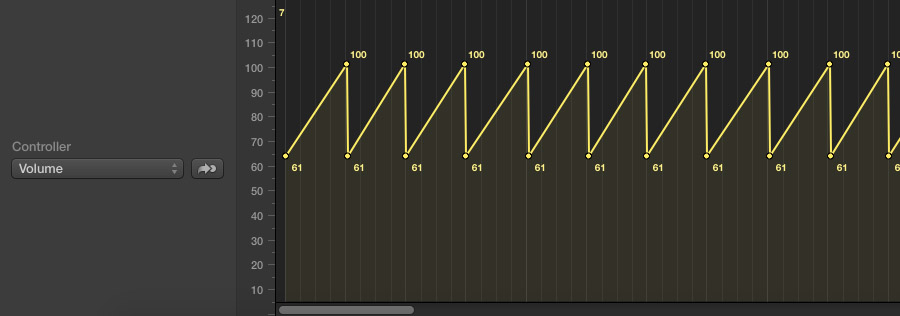
You could also simulate a "Gater-Effect", as shown below.
Or maybe you want to simulate a "Sidechain-Compression-Effect", as used in many modern music productions.
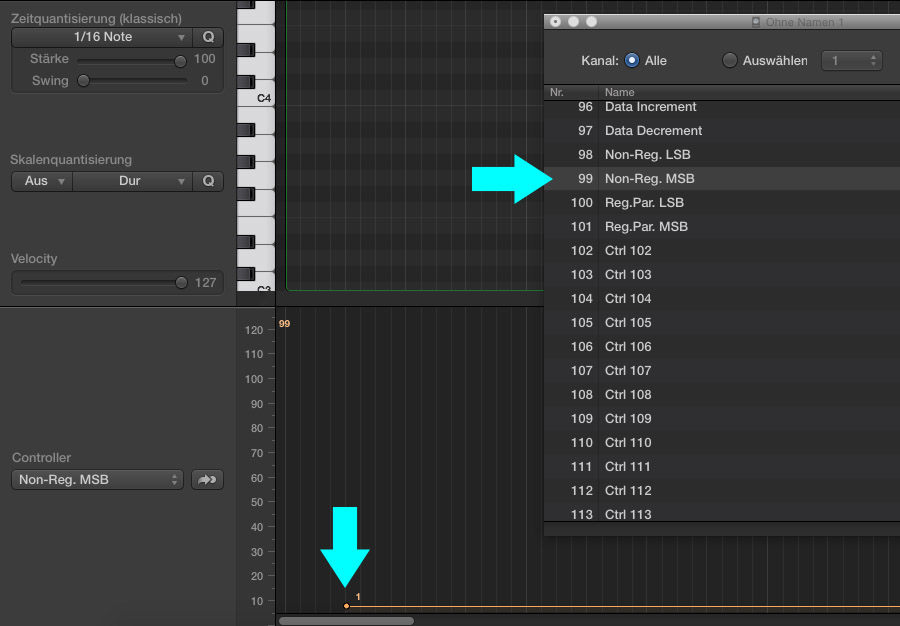
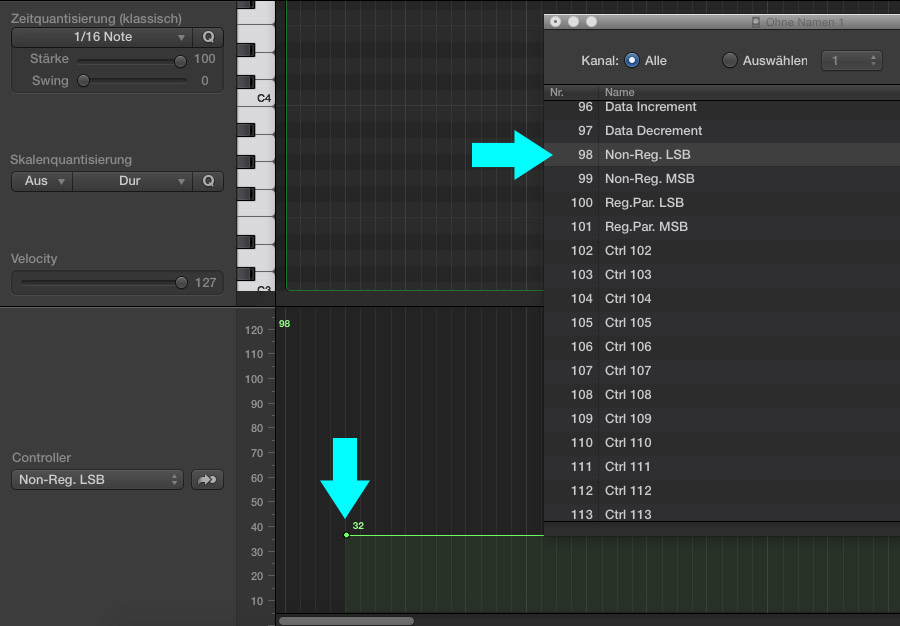
But how to proceed, if you would like to control the Filter-Cutoff of a MIDI device? Navigate to the Pianoroll Editor menu "Controller" to get access to the MIDI-Draw window.
Select the option "Others..."
Set "MIDI-CC 99" (Non-Reg. MSB) to the amount of 1.
Set "MIDI-CC 98" (Non-Reg. LSB) to the amount of 32.
And finally, to select the function "Filter-Cutoff", select the "MIDI-CC 6" (Data MSB). Now you can draw your filter curve automations.

If you have further questions about the procedures explained in this tutorial, please contact us via the form in the "Contact section" of our website.
The Roland MC-303 offers 8 tracks, which can be controlled via MIDI simultaneously:
1 track for the Rhythmsection and 7 tracks for the other internal sounds. So, a single MC-303 can be used to create a complete track or song.
But:
As some other MIDI Machines out there, the MC-303 sometimes loses track of some MIDI implementations from time to time or from case to case. Working on the MC-303 in MIDI Multitrack-Mode is sometimes tricky, and sometimes uncomfortable. The primary reason for that is, that the MC-303 sometimes "forgets" about Program Change Messages or just ignores them. No worry, you will learn how to handle that kind of problem.
Note:
The screenshots for this tutorial have been taken from the german version of the sequencer "Logic Pro X", so you will see all commands in german language instead of english. The text of this tutorial will always mention the english commands in addition.
Further:
To follow the steps of this tutorial, the MC-303 has to be connected to a MIDI device at least via "MIDI-IN".
Step 1: Initialize Soundmodule-Mode
If you want to create a track with the MC-303 using more than just one single MIDI track, then you will have to start the MC-303 in the "Soundmodule-Mode".
Hold down the button "Play Mode" while powering up your MC-303, as marked in the illustration below in cyan. In "Soundmodule-Mode", you will notice that the track-selectors, mute-buttons and all realtime-controllers are inactive. You can controll all these parameters via MIDI only.
Step 2: Working on the Rhythmsection
Lets say, the intention is to start with a Rhythmtrack, so the fundament for beats and percussions will be layed. On the MC-303, MIDI-Channel 10 is reserved for drums and percussions. So you will have to create a MIDI-Track for Channel 10 first in your DAW. In case of "Logic Pro X" you can select the little "+" icon, or use the menu option "Track > New tracks..."
The option dialog for creating new tracks will appear. By default, a MIDI device from your list of connected devices will be available.
Use the dropdown menu labeled as "Output" to select the MC-303 on MIDI-Channel 10.
To confirm the new MIDI-Track, click the button "Create".
Now create an empty region on the new created MIDI-Track.
Now lets dive right into the usage of "CC-Commands" and "Program Changes". Its important to know that it is useful to create a reserved space at the beginning of your arrangement to initialize all the basic MIDI commands. In this tutorial, a MIDI-Track with a length of 8 bars has been created. So, it is a good method to extend the region by one additional bar. In the first bar right at the start of the arrangement, the MIDI commands will be inserted.
Doubleclick the MIDI-Region to enter the Pianoroll Editor. By default, you wont see the MIDI-Draw section.
To initialize that section, navigate to the Pianoroll Editor menu "View", click "MIDI-Draw" and select "Volume" (or any other displayed option).
Head over to the Pianoroll Editor menu "Controller" (located on the left side), and select "Program Change".
Set a value inside the drawbar. In this tutorials case, Program Change has been set to the value of 81, so the "Hip Hop Drumset" of the MC-303 has been selected. Now proceed to draw MIDI-Events and program the beat section of your track.
Step 2: Adding more MIDI-Tracks
Create another, additional MIDI-Track by clicking onto the "+" icon.
The option dialog for creating new tracks will appear. Select the MC-303 again, and chose "MIDI-Channel 1".
As explained before, create an empty MIDI-Region. Keep in mind to keep 1 bar reserved at the beginning for initializing the required values.
Next, you need to activate the "Program Change Function" of the new MIDI-Track. In case of "MIDI-Channel 10", it was not necessary, because the Rhythm-Section of the MC-303 just needs one single Program Change command to select the Drumkit. In case of "normal" MIDI-Tracks, the activation of the Program Change command is important.
Now doubleclick the new MIDI-Region to enter the Pianoroll Editor and navigate to the Pianoroll Editor menu "Controller" to get access to the MIDI-Draw window.
Select the option "Others..."
Set "MIDI-CC 0" (Bank MSB) to the amount of 64.
Set "MIDI-CC 32" (Bank LSB) to the amount of 0.
Now the "sound-selector", known as "Program Change", has to be set. In this tutorials case, the value of 66 has been chosen.
Some additional infos:
On the last MIDI-Track, you noticed, that 2 values for "CC-Controllers" and 1 value for "Program Change" are required to select a bank and a preset of the MC-303. On CC-Controller 0, the value "64" has been set. On CC-Controller 32, the value "0" was chosen. And finally, on Program Change, the value "66" has been defined. These 3 values are just example values to select the preset "101 Bass 1" from the MC-303 Soundbank "Bass".
Please refere your MC-303 manual for the complete list of banks and presets including the required values for CC-Controllers and Program Changes.
Step 3: Adding some spice
When completed your arrangement using multiple MIDI-Tracks, you maybe want to add some additional MIDI-Events like Filter-Cutoffs, Volume-Automations or Effect-Changes. This will be realized by using further CC-Controllers and values on the different MIDI-Tracks.
In this tutorial, the automation of "Volume" and "Filter-Cutoff" will be explained. Please refere your MC-303 manual for the list of automation options, required CC-Controllers and values.
Setting the "Channel-Volume" is quite simple. Doubleclick the MIDI-Region, you want to edit. Navigate to the Pianoroll Editor menu "View", select "MIDI-Draw" and click the option "Volume".
Draw your automation, Fade-Ins and Fade-Outs are also possible.
You could also simulate a "Gater-Effect", as shown below.
Or maybe you want to simulate a "Sidechain-Compression-Effect", as used in many modern music productions.
But how to proceed, if you would like to control the Filter-Cutoff of a MIDI device? Navigate to the Pianoroll Editor menu "Controller" to get access to the MIDI-Draw window.
Select the option "Others..."
Set "MIDI-CC 99" (Non-Reg. MSB) to the amount of 1.
Set "MIDI-CC 98" (Non-Reg. LSB) to the amount of 32.
And finally, to select the function "Filter-Cutoff", select the "MIDI-CC 6" (Data MSB). Now you can draw your filter curve automations.
If you have further questions about the procedures explained in this tutorial, please contact us via the form in the "Contact section" of our website.