Tutorials ⟩ Arturia Keylab Essential Configuration

Installing the controller keyboards of Arturias "Keylab Essential series" is quite simple, because the hardware is "class-compilant" and dont needs additional driver support. This tutorial wants to inspire you to dive deeper into the specific configuration of the controller. Basically, there are 2 pre-defined controller-maps, but maybe you want define and to store your own functions and commands.
What additional software is required?
To follow all the steps of this tutorial, it is necessary to install an additional software by Arturia called "MIDI Control Center", which will give you access to all necessary parameters and allow you to store your settings. "MIDI Control Center" is a free software and available for download here: Arturia support section
Notice: This tutorial tries to explain the procedure of customizing your controller keyboard in an easy-to-understand way. For more deeper or more specific informations, please refere to your original manual.
Step 1 - Basics and preparations
Once you have installed your hardware and "MIDI Control Center", its time to start the application. On first run, it can happen, that "MIDI Control Center" shows a message, which sais that your device could not be located. In that case, a reboot of your computer will solve the problem. Depending on your hardware, it also can happen, that the installed version of the internal firmware is not the latest version. If thats the case, you first should update your firmware. Its no witchcraft - that procedure is very easy and fast to handle.
Upgrading the firmware

To make sure your "Keylab Essentials" has the latest firmware running, start the "MIDI Control Center" and have a look in the upper, left corner of the application, whats the current version of your firmware is.

If your firmware is not the latest version, go to the Arturia support website and download the latest version. After you downloaded the file and placed it onto your HD, simply click on the button which shows the version of the firmware. A message appears which asks you if you want to upgrade or cancel. Select "Upgrade" and locate your downloaded file in the opening file browser. Confirm with "OK" and the upgrade will start.
Now you should be ready to customize the controller settings.
Step 2 - Organisation of Maps
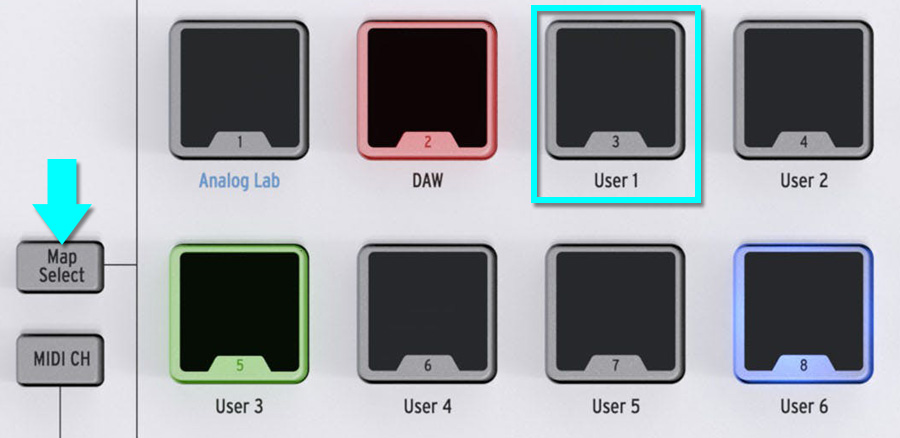
The controller keyboard offers 8 maps, 2 of them are already pre-defined. A map can be described best as "bank", where all settings and functions are stored. In the graphic below, you will notice that Map 1 is pre-configured for the use of the Arturia software "Analog Lab" and Map 2 is pre-configured for DAW functions like Record, Play, Stop, Save etc. Overall, there are 6 Maps left to organize your custom settings. To select a Map, press the button "Map Select" and select a Map by pressing one of the 8 Pads. In this tutorials case, Pad 3 marked as "User 1" should be selected.
Step 3 - Cutomizing parameters in the Editor
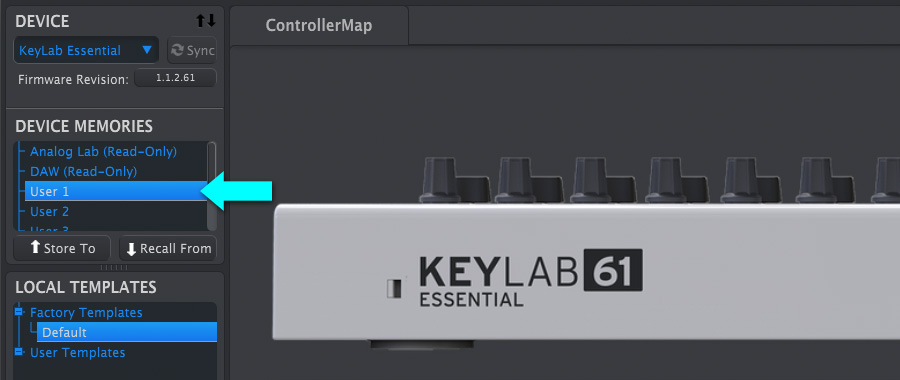 Now everything is prepared to start the working with the Editor "MIDI Control Center". Start the application and first select "User 1" from the menu "Device Memories". This will ensure that every edit of parameters taken from now on will correspond with the selected Map "User 1" on the controller keyboard.
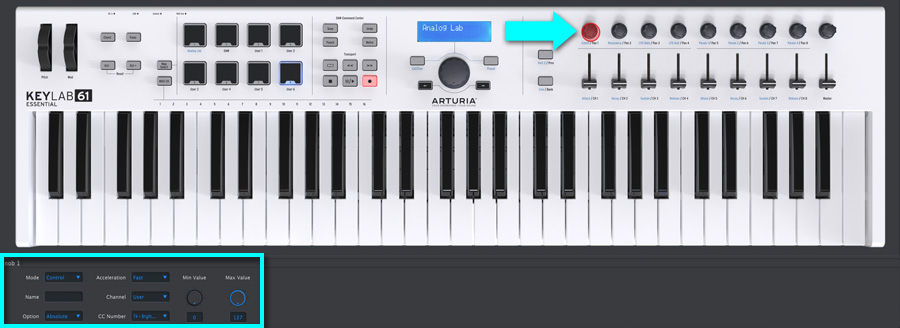
The interface of the Editor shows the controller keyboard with all its controller elements displayed from above. For example, you want to configure Knob 1, just click onto it and it will be hovered red. Additionally, you will find all editable elements of the selected knob in the context area at the bottom of the application.

Now lets explore the options for the selected rotary encoder.
Mode: Deactivate knob (Off) or activate knob (Control).
Name: Title or function of the encoder. Will also be shown in the LCD-Display of the controller.
Option: This lets you modify the encoders response from Absolute to Relative (in 3 different levels).
Acceleration: Defines how the encoder responds to handling.
- None: Encoder responds at a set speed.
- Medium: Value will accelerate when encoder moved faster
- Fast: Value accelerates quickly when moved faster
- 1:1: Precisely matches the speed the encoder is moved.
Channel: Option to define the MIDI-Channel the encoder will affect
CC Number: Set the CC-Controller number the encoder will control.
Min Value and Max Value: The standard range for MIDI control parameters is set from 0 to 127. In some cases, it might be helpful to reduce the active range of the controller, for example to ensure the value only moves within a specific synth parameter. The "value range" of the encoder can be defined with both parameters.
 The setting options for faders are similar the same, only the field Option provides 2 different modes. Fader lets the encoder behave like a classical fader, additionally the function Drawbar could be of interest if you would like to use the fader like the Drawbar of an Organ.

The third controller components are the Pads, which allow various controller options.
Mode: Select between 5 different controller modes.
- Off: Disables the Pads as controller
- MIDI Note: This option is used to output standard MIDI notes using the pad.
- Switched Control: Use the pads as a parameter controller.
- Patch Change: Trigger patches and program changes within virtual instruments, outboard gear and more.
- MMC: Use any of the pads as an MMC command button (Start, Stop and Record).
Both operation modes, MIDI Note and Switched Control, are offering 2 options of interest in the dropdown menu "Option": "Gate" and "Toggle". Gate activates the pad only when struck or depressed and deactivates it when released, and Toggle activates the pad when struck, and deactivates it when struck again. The option Color defines the color the pads will illuminate when pressed. The parameter Note sets the note to be played when the corresponding pad is pressed.

Specific information about "Patch Change Mode": This option allows you to use KeyLab Essential’s pads to trigger patch and program changes within virtual instruments, outboard synths, and much more.
Channel: Select the MIDI channel output for the selected pad, between 1 to 16. This can also be set to “user”, which will make the pad output to the default MIDI channel selected in the Device Settings.
Program Number: Select the MIDI Program number you wish to change when the pad is activated. Use the on-screen rotary to choose a value between 0 and 127.
Bank LSB and Bank MSB: These parameters let you define the Least Significant Byte and Most Significant Byte determined when the pad is activated. Use the on-screen rotaries to choose a value between 0 and 127. To determine how to set these parameters, consult the documentation of the hardware or software instrument you are controlling using KeyLab Essential.
Step 4 - Manage and store Maps

When all parameters have been set, they should be stored into a specific Map. In this tutorials case, we selected "User 1" as Map. Navigate to the bottom of the left side and click the button "Save As...".

The saved settings will appear in the section "Local Templates" under "User Templates".

Now all you have to do at least, is to transfer your settings to the controller keyboard. Be sure you have select "User 1" as destination patch and press the buttom "Store To". A progressbar at the bottom of the application will display the state of transmission of data, but overall, this procedure will take only a few seconds. From now on, the Maps name will be shown in the LCD-Display of the controller keyboard, besides all the parameter names you defined on the various encoders.

Further, there are options to delete Maps, creating blank ones, importing or exporting the Maps as external file, which is great option for a safety backup.
Step 5 - Additional functions and general settings

Global functions and parameters of the controller keyboard can be modified in the section "Device Settings", you will find the tab to access the section in the upper left corner of the application. Most parameters are self-explaining, but maybe you are confused why your controller starts that eye-catching lightshow when left untouched for about 5 minutes. If that effect disturbs you or if you dont need this "Screensaver Effect", you simply have to disable the function "Vegas Mode".
Installing the controller keyboards of Arturias "Keylab Essential series" is quite simple, because the hardware is "class-compilant" and dont needs additional driver support. This tutorial wants to inspire you to dive deeper into the specific configuration of the controller. Basically, there are 2 pre-defined controller-maps, but maybe you want define and to store your own functions and commands.
What additional software is required?
To follow all the steps of this tutorial, it is necessary to install an additional software by Arturia called "MIDI Control Center", which will give you access to all necessary parameters and allow you to store your settings. "MIDI Control Center" is a free software and available for download here: Arturia support section
Notice: This tutorial tries to explain the procedure of customizing your controller keyboard in an easy-to-understand way. For more deeper or more specific informations, please refere to your original manual.
Step 1 - Basics and preparations
Once you have installed your hardware and "MIDI Control Center", its time to start the application. On first run, it can happen, that "MIDI Control Center" shows a message, which sais that your device could not be located. In that case, a reboot of your computer will solve the problem. Depending on your hardware, it also can happen, that the installed version of the internal firmware is not the latest version. If thats the case, you first should update your firmware. Its no witchcraft - that procedure is very easy and fast to handle.
Upgrading the firmware
To make sure your "Keylab Essentials" has the latest firmware running, start the "MIDI Control Center" and have a look in the upper, left corner of the application, whats the current version of your firmware is.
If your firmware is not the latest version, go to the Arturia support website and download the latest version. After you downloaded the file and placed it onto your HD, simply click on the button which shows the version of the firmware. A message appears which asks you if you want to upgrade or cancel. Select "Upgrade" and locate your downloaded file in the opening file browser. Confirm with "OK" and the upgrade will start.
Now you should be ready to customize the controller settings.
Step 2 - Organisation of Maps
The controller keyboard offers 8 maps, 2 of them are already pre-defined. A map can be described best as "bank", where all settings and functions are stored. In the graphic below, you will notice that Map 1 is pre-configured for the use of the Arturia software "Analog Lab" and Map 2 is pre-configured for DAW functions like Record, Play, Stop, Save etc. Overall, there are 6 Maps left to organize your custom settings. To select a Map, press the button "Map Select" and select a Map by pressing one of the 8 Pads. In this tutorials case, Pad 3 marked as "User 1" should be selected.
Step 3 - Cutomizing parameters in the Editor
Now everything is prepared to start the working with the Editor "MIDI Control Center". Start the application and first select "User 1" from the menu "Device Memories". This will ensure that every edit of parameters taken from now on will correspond with the selected Map "User 1" on the controller keyboard.The interface of the Editor shows the controller keyboard with all its controller elements displayed from above. For example, you want to configure Knob 1, just click onto it and it will be hovered red. Additionally, you will find all editable elements of the selected knob in the context area at the bottom of the application.
Now lets explore the options for the selected rotary encoder.
Mode: Deactivate knob (Off) or activate knob (Control).
Name: Title or function of the encoder. Will also be shown in the LCD-Display of the controller.
Option: This lets you modify the encoders response from Absolute to Relative (in 3 different levels).
Acceleration: Defines how the encoder responds to handling.
- None: Encoder responds at a set speed.
- Medium: Value will accelerate when encoder moved faster
- Fast: Value accelerates quickly when moved faster
- 1:1: Precisely matches the speed the encoder is moved.
Channel: Option to define the MIDI-Channel the encoder will affect
CC Number: Set the CC-Controller number the encoder will control.
Min Value and Max Value: The standard range for MIDI control parameters is set from 0 to 127. In some cases, it might be helpful to reduce the active range of the controller, for example to ensure the value only moves within a specific synth parameter. The "value range" of the encoder can be defined with both parameters.
The setting options for faders are similar the same, only the field Option provides 2 different modes. Fader lets the encoder behave like a classical fader, additionally the function Drawbar could be of interest if you would like to use the fader like the Drawbar of an Organ.The third controller components are the Pads, which allow various controller options.
Mode: Select between 5 different controller modes.
- Off: Disables the Pads as controller
- MIDI Note: This option is used to output standard MIDI notes using the pad.
- Switched Control: Use the pads as a parameter controller.
- Patch Change: Trigger patches and program changes within virtual instruments, outboard gear and more.
- MMC: Use any of the pads as an MMC command button (Start, Stop and Record).
Both operation modes, MIDI Note and Switched Control, are offering 2 options of interest in the dropdown menu "Option": "Gate" and "Toggle". Gate activates the pad only when struck or depressed and deactivates it when released, and Toggle activates the pad when struck, and deactivates it when struck again. The option Color defines the color the pads will illuminate when pressed. The parameter Note sets the note to be played when the corresponding pad is pressed.
Specific information about "Patch Change Mode": This option allows you to use KeyLab Essential’s pads to trigger patch and program changes within virtual instruments, outboard synths, and much more.
Channel: Select the MIDI channel output for the selected pad, between 1 to 16. This can also be set to “user”, which will make the pad output to the default MIDI channel selected in the Device Settings.
Program Number: Select the MIDI Program number you wish to change when the pad is activated. Use the on-screen rotary to choose a value between 0 and 127.
Bank LSB and Bank MSB: These parameters let you define the Least Significant Byte and Most Significant Byte determined when the pad is activated. Use the on-screen rotaries to choose a value between 0 and 127. To determine how to set these parameters, consult the documentation of the hardware or software instrument you are controlling using KeyLab Essential.
Step 4 - Manage and store Maps
When all parameters have been set, they should be stored into a specific Map. In this tutorials case, we selected "User 1" as Map. Navigate to the bottom of the left side and click the button "Save As...".
The saved settings will appear in the section "Local Templates" under "User Templates".
Now all you have to do at least, is to transfer your settings to the controller keyboard. Be sure you have select "User 1" as destination patch and press the buttom "Store To". A progressbar at the bottom of the application will display the state of transmission of data, but overall, this procedure will take only a few seconds. From now on, the Maps name will be shown in the LCD-Display of the controller keyboard, besides all the parameter names you defined on the various encoders.
Further, there are options to delete Maps, creating blank ones, importing or exporting the Maps as external file, which is great option for a safety backup.
Step 5 - Additional functions and general settings
Global functions and parameters of the controller keyboard can be modified in the section "Device Settings", you will find the tab to access the section in the upper left corner of the application. Most parameters are self-explaining, but maybe you are confused why your controller starts that eye-catching lightshow when left untouched for about 5 minutes. If that effect disturbs you or if you dont need this "Screensaver Effect", you simply have to disable the function "Vegas Mode".